Introduction
Since 2021 the AgERA5 dataset is available on the Copernicus Climate Data Store (CDS). AgERA5 provides daily values of 22 commonly used meteorological variables globally at a 0.1x0.1 degree resolution. AgERA5 is derived from the ERA5 reanalysis dataset developed by ECMWF, but is specifically designed for agrometeorological applications. For example, ERA5 consists of hourly data which is often not convenient for agrometeorological purposes where daily data is often required. So the AgERA5 product already does the aggregation from hourly to daily values taking into account that the definition of day-time and night-time is time-zone dependent. Moreover, many agro-relevant variables have been derived such as daily min/max temperature, total daily solar radiation, daily precipitation sums, etc. Finally, similar to ERA5, AgERA5 is updated daily with a delay on realtime of 8 days.
Nevertheless, setting up AgERA5 in a way that is convenient for end users still requires a considerable effort. For example, the dataset is provided by the CDS as netCDF files but a way to easily access the data is not available. In this respect, the end-user experience of the NASA POWER dataset is much better as it provides a user interface and a convenient web API to query data. The AgERA5tools package has been developed to alleviate the problem with accessing AgERA5 data. It makes setting up a local mirror of AgERA5 much easier, time series of meteorological data can be extracted easily and it provides a web API that can be used by other applications to easily access AgERA5 data.
Setting up AgERA5tools
Choosing a suitable location
Depending on your settings the amount of data that is downloaded and written by agera5tools can be large. Downloading global data for the entire archive 1979-current can easily generate several Tb of data. A small setup with data for the Netherlands with data since 2017 is about 2 Gb.
So before installing agera5tools you should select a location on you system with sufficient space for storing data. In the rest of the userguide we assume this location is /data/agera5
Creating a python environment
A python environment has to be created that has all the requirements for AgERA5tools. AgERA5tools was developed using python 3.10 but this is not critical. Older or more recent version of python will most likely work as well. Third party packages required for installing are:
- pandas>=2.0
- PyYAML >= 6.0
- SQLAlchemy >= 2.0
- PyYAML >= 6.0
- xarray >= 2023.6.0
- dask >= 2023.0.0
- click >= 8.1
- flask >= 2.2
- cdsapi >= 0.7.5
- dotmap >= 1.3
- netCDF4 >= 1.6
- requests >= 2.28
- wsgiserver >= 1.3
- duckdb >= 1.1.3
- duckdb_engine >= 0.13.6
Although exact version numbers are provided, this is usually not critical.
Creating a python environment (installing Python is not covered here) from the command prompt can be done with the command:
$ cd /data/agera5/
$ python -m venv py310_a5t
The environment can be activated with:
$ source py310_a5t/bin/activate
Which will change the command prompt and allows to start the python interpreter in the virtual environment:
(py310_a5t) $ python
Python 3.10.14 (main, May  6 2024, 19:42:50) [GCC 11.2.0] on linux
Type "help", "copyright", "credits" or "license" for more information.
>>>
Installing AgERA5tools
Finally, agera5tools can be installed with pip:
$ pip install agera5tools
this will install agera5tools and its dependencies. The output should look like:
Downloading https://github.com/ajwdewit/agera5tools/archive/refs/heads/develop_duckdb.zip
     - 3.1 MB 11.2 MB/s 0:00:00
  Installing build dependencies ... done
  Getting requirements to build wheel ... done
  Preparing metadata (pyproject.toml) ... done
Collecting cdsapi>=0.7.5
  Downloading cdsapi-0.7.5-py2.py3-none-any.whl (12 kB)

...

Successfully built agera5tools
Installing collected packages: wsgiserver, pytz, dotmap, zipp, urllib3, tzdata, typing-extensions, tqdm, toolz, six, PyYAML, packaging, numpy, MarkupSafe, locket, itsdangerous, idna, greenlet, fsspec, duckdb, cloudpickle, click, charset-normalizer, certifi, blinker, attrs, Werkzeug, SQLAlchemy, requests, python-dateutil, partd, Jinja2, importlib_metadata, cftime, pandas, netCDF4, multiurl, flask, duckdb_engine, dask, xarray, datapi, cdsapi, agera5tools
Successfully installed Jinja2-3.1.4 MarkupSafe-3.0.2 PyYAML-6.0.2 SQLAlchemy-2.0.36 Werkzeug-3.1.3 agera5tools-2.1.0 attrs-24.3.0 blinker-1.9.0 cdsapi-0.7.5 certifi-2024.12.14 cftime-1.6.4.post1 charset-normalizer-3.4.0 click-8.1.7 cloudpickle-3.1.0 dask-2024.12.1 datapi-0.1.1 dotmap-1.3.30 duckdb-1.1.3 duckdb_engine-0.14.0 flask-3.1.0 fsspec-2024.10.0 greenlet-3.1.1 idna-3.10 importlib_metadata-8.5.0 itsdangerous-2.2.0 locket-1.0.0 multiurl-0.3.3 netCDF4-1.7.2 numpy-2.2.0 packaging-24.2 pandas-2.2.3 partd-1.4.2 python-dateutil-2.9.0.post0 pytz-2024.2 requests-2.32.3 six-1.17.0 toolz-1.0.0 tqdm-4.67.1 typing-extensions-4.12.2 tzdata-2024.2 urllib3-2.2.3 wsgiserver-1.3 xarray-2024.11.0 zipp-3.21.0
The agera5tools package can now be imported from python:
(py310_a5t)$ python
Python 3.10.14 (main, May  6 2024, 19:42:50) [GCC 11.2.0] on linux
Type "help", "copyright", "credits" or "license" for more information.
>>> import agera5tools
No config found, use `agera5tools init` to generate one!
>>>
Moreover, there should be an agera5tools command in your current environment:
$ agera5tools
No config found, use `agera5tools init` to generate one!
Usage: agera5tools [OPTIONS] COMMAND [ARGS]...

Options:
  --version  Show the version and exit.
  --help     Show this message and exit.

Commands:
  build          Builds the AgERA5 database by bulk download from CDS
  buildym        Builds the AgERA5 database by bulk download from CDS for...
  check          Checks the completeness of NetCDF files from which the...
  clip           Extracts a portion of agERA5 for the given bounding box...
  dump           Dump AgERA5 data for a given day to CSV, JSON or SQLite
  dump_grid      Dump the agERA5 grid to a CSV, JSON or SQLite DB.
  extract_point  Extracts AgERA5 data for given location and date range.
  init           Initializes AgERA5tools
  mirror         Incrementally updates the AgERA5 database by daily...
  serve          Starts the http server to serve AgERA5 data through HTTP
Since we have not set up agera5tools, the package is complaining that a configuration file cannot be found. We will now initialize agera5tools and create a configuration.
Initializing agera5tools - part I
First of all, a location needs to be created where agera5tools can store the configuration file, data, logs and temporary storage. In this setup we assume that this will be under /data/agera5/. A DuckDB database will then be created under /data/agera5/agera5.ddb, log files will reside under /data/agera5/logs/, NetCDF files downloaded from the Climate Data Store will go under /data/agera5/ncfiles while CSV exports and temporary files go under /data/agera5/csv and /data/agera5/tmp.
The first step is to run the init command. This command creates a default configuration file in the current directory. Press enter to abort the init process in order to first modify the configuration file:
$ agera5tools init
No config found, use `agera5tools init` to generate one!
Successfully created agera5tools config file at:
   /data/agera5/agera5tools.yaml

You just created a new configuration file time. Now carry out the following steps:
  1) inspect/update your configuration file first and update the paths for data storage.
     Currently all paths point to your home folder, which may not be suitable.
  2) Set the AGERA5TOOLS_CONFIG environment variable to the location of the configuration file.
  3) Next rerun `init` to finalize the initialization
Now we need to inspect the agera5tools.yaml file with a text editor. We will go through the section of the configuration file below.
Adapting the configuration file
For this guide we will mostly use the default settings which are already defined in the agera5tools.yaml file. It will set up agera5tools for a region including Bangladesh for a single year (2022). This will lead to a relatively small database file of 1.3 Gb. Be aware that choosing a large region, will very quickly lead to a large database and in such cases other database solutions should be chosen. Moreover, for large areas agera5tools will require a considerable amount of computer memory because it converts a month of AgERA5 data into a pandas dataframe which must be held in-memory.
Logging
Only the path to the logging directory needs to be set.
logging:
  # Details for the log. Log levels follow conventions of the python logging framework.
  log_path: /data/agera5/logs
  log_fname: agera5tools.log
  log_level_console: WARNING
  log_level_file: INFO
Region definition
The region of interest is defined by the min/max longitude and latitude in decimal degrees. Moreover a name for the region should be provided.
region:
  # This defines the characteristics of the region that you want to set up.
  name: "Bangladesh"
  boundingbox:
    lon_min: 87
    lat_min: 20.5
    lon_max: 93
    lat_max: 27
Temporal range
The temporal range defines the time range for which the database should be retrieved from the CDS. Most important here is the start_year which should be >= 1979. For a database which will be updated daily (e.g. a mirror), the end_year should be in the future but for a database with a fixed time period another end_year can be chosen. For the current example, we only select data from 1 January 2022 onward by setting start_year: 2022 and end_year: 2099.
temporal_range:
  # Temporal range defines the time range for which the database should be retrieved from the CDS.
  # Most important here is the start_year which should be >= 1979. For a database which will be
  # updated daily (e.g. a mirror), the end_year should be in the future but for a database with a
  # fixed time period another end_year can be chosen.
  start_year: 2022
  end_year: 2099
Miscellaneous
The most important setting here is the reference_point. This point is defined by its latitude/longitude and is used by agera5tools to query the database for the dates where AgERA5 data is available. Based on the difference between the available dates in the database and the current date, agera5tools decides which days should be mirrored and retrieved from the CDS. Note that the reference_point should lie within the bounding box of the area of interest and should be located on land.
Some other settings have to do with the search radius (can be left as is) and whether values in Kelvin should be converted to Celsius. Finally the agera5_version has to be set, as of June 2025, AgERA5 v2.0 is available. Using AgERA5tools with AgERA5 v1.1 is not supported anymore.
misc:
  # Miscellaneous settings:
  #  - agera5_version indicates the version to use. As of May 2025 only v2.0 is supported.
  #  - The reference point defines a point within the boundingbox that will be used by the mirror
  #    procedure to check the available dates in the database. This point should be on land!
  #  - grid_search_radius is the radius within which the nearest grid ID will be searched,
  #    leave as is.
  #  - kelvin_to_celsius indicates if temperature conversion should be done.
  agera5_version: "2.0"
  reference_point:
    lon: 90.00
    lat: 23.97
  grid_search_radius: 0.2
  kelvin_to_celsius: yes
Credentials for the Climate Data Store
The API credentials for the Climate Data Store can be obtained by registering on the CDS and retrieving the UID and API key from your login details page on the CDS. Note that the API Key is not the same as your password that you used to register on the CDS. Moreover, if you are already using the python cdsapi package to retrieve data from the CDS, you probably already have a .cdsapirc file in your home folder and you can skip this step.
Further, there is an option max_tries that specifies the maximum number of tries that agera5tools will make to download a file from the cDS. The concurrent_downloads specifies the maximum number of simultaneous requests to the CDS that agera5tools will make. Increasing the number may speed up downloads at the risk of running into a rate limit and you requests being discarded. According to the documentation the maximum value is around 9 concurrent requests.
Warning
with the migration to the new CDS in September 2024 your old .cdsapirc may not be valid anymore and you better delete it and generate a new one.
cdsapi:
  # Details for the Copernicus Climate Data Store. Information here will be written into the
  # $HOME/.cdsapirc file, which is used by the python API client for the CDS.
  url: https://cds.climate.copernicus.eu/api
  key: <PERSONAL-ACCESS-TOKEN here>
  max_tries: 5
  concurrent_downloads: 5
Warning
Using the CDS API requires you to accept the Terms of Reference of the Copernicus Climate Data Store. So if you just created an account on the CDS: First download a random AgERA5 file through the CDS web interface, a screen will be shown where you can accept the ToR. Afterward you can use agera5tools. Not accepting the ToR will give strange errors when using agera5tools.
Database settings
The database settings define the data source name to the database and the table name used to store the AgERA5 data. Note that the DSN should follow the SQLAlchemy database URL naming convention. The example below uses a local DuckDB database which is a serverless database without security risks.
The chunk_size parameter defines the number of records that are written to the database as one chunk. Increasing this number may increase database performance. Chunked writing was added because a log message is written after each chunk which allows to keep track of progress during database writing. The chunk_size parameter should be larger than zero.
Warning
The data source name to the database stores the database username/password in plain text. This is a potential security risk and for servers that are exposed on the web other solutions are required. This could be done by putting agera5tools in a Docker container and using Sealed Secrets
database:
  # Details for the database that will be used to store the AgERA5 data.
  # The data source name (dsn) points to the database and should have the form of an
  # SQLAlchemy database URL: https://docs.sqlalchemy.org/en/20/core/engines.html
  # Note that the URL may contain the database password in plain text which is a security
  # risk.
  dsn: duckdb:////data/agera5/agera5.ddb
  agera5_table_name: weather_grid_agera5
  grid_table_name: grid_agera5
  chunk_size: 10000
Data storage locations
Agera5tools requires several locations on the filesystem for storing netCDF files, log files and optionally compressed CSV exports that can be used to manually load data into the database. Keeping the NetCDF files that are downloaded from the CDS is optional, but makes rebuilding the database faster as no downloads to have be carried out. Since NetCDF files have compression they store the data very efficiently so usually there is no reason to delete the NetCDF files.
data_storage:
  # Storage path for NetCDF files, CSV files and temporary storage.
  netcdf_path: /data/agera5/ncfiles/
  keep_netcdf: yes
  tmp_path: /data/agera5/tmp
  csv_path: /data/agera5/csv
AgERA5 variable selection
The YAML configuration below can be used to select which AgERA5 variables must be downloaded and made available through the web API. By default 8 variables are selected which are used to run common crop simulation models like WOFOST, LINGRA, DSSAT, etc.
variables:
  # Select which variables should be downloaded from the CDS
  Temperature_Air_2m_Mean_24h: yes
  Temperature_Air_2m_Mean_Day_Time: no
  Temperature_Air_2m_Mean_Night_Time: no

  ...

  Relative_Humidity_2m_18h: no
  Precipitation_Rain_Duration_Fraction: no
  Precipitation_Solid_Duration_Fraction: no
Initializing agera5tools - Part II
After modifying the agera5tools configuration file, we need to instruct agera5tools to use our new configuration file. This is done by setting an environment variable which points to the location of the configuration file. In a Linux bash shell this is done as:
$ export AGERA5TOOLS_CONFIG=/data/agera5/agera5tools.yaml
$ agera5tools
using config from /data/agera5/agera5tools.yaml
Usage: agera5tools [OPTIONS] COMMAND [ARGS]...

Options:
  --help  Show this message and exit.

Commands:
  build          Builds the AgERA5 database by bulk download from CDS
  buildym        Builds the AgERA5 database by bulk download from CDS for...
  check          Checks the completeness of NetCDF files from which the...
  clip           Extracts a portion of agERA5 for the given bounding box...
  dump           Dump AgERA5 data for a given day to CSV, JSON or SQLite
  dump_grid      Dump the agERA5 grid to a CSV, JSON or SQLite DB.
  extract_point  Extracts AgERA5 data for given location and date range.
  init           Initializes AgERA5tools
  mirror         Incrementally updates the AgERA5 database by daily...
  serve          Starts the http server to serve AgERA5 data through HTTP
When running the agera5tools command, it now stops complaining about a missing configuration file and it points to the correct file location. Note that on Windows OS, setting an environment variable should be done as:
$ set AGERA5TOOLS_CONFIG c:\data\agera5\agera5tools.yaml
Now we can finalize the init proces by rerunning the init command:
$ agera5tools init
using config from /data/agera5/agera5tools.yaml

If this is the first time you run `init` you probably want to abort now and inspect/update your
configuration file first. Continue? [y/N]: y
Checking credentials for the Copernicus Climate Data Store.
  The .cdsapirc file already exists at /home/wit015/.cdsapirc
  WARNING: Credentials in .cdsapirc file do NOT match with ones in agera5tools.yaml.
  Generate a new .cdsapirc file? [y/N]:
  Leaving current .cdsapirc file as is.
Initializing database at duckdb:////home/wit015/agera5/agera5.ddb
  Succesfully created tables on DSN=Engine(duckdb:////home/wit015/agera5/agera5.ddb)
AgERA5tools successfully initialized!.
As you see, agera5tools has checked if a .cdsapirc file exists. In this case it did find one, otherwise it would have created one. Next, it has created an DuckDB database that will be used for storing the AgERA5 data. Note that agera5tools can use databases like MySQL or PostgreSQL but if there is no specific reason for using a client/server database then DuckDB is often the simplest and fastest option.
Building the database
The next step in the agera5tools setup is to build the database. This means that agera5tools will download the netCDF files from the CDS for the period, region and variables that you specified in the configuration file. The data will be exported and loaded into the database specified in the configuration file. The build command was designed for bulk downloading and processing which is done once. Next, the mirror command can be used for incremental updates of the database.
When looking at the build command in more detail, it provides to additional options which are –to_database and –to_csv:
$ agera5tools build --help
using config from /data/agera5/agera5tools.yaml
Usage: agera5tools build [OPTIONS]

  Builds the AgERA5 database by bulk download from CDS

Options:
  -d, --to_database  Load AgERA5 data into the database
  -c, --to_csv       Write AgERA5 data to compressed CSV files.
  --help             Show this message and exit.
Without those options, the build command only downloads NetCDF files but does not load anything in the database or export to CSV. It will therefore issue a warning that no output will be written to the database.
The background of implementing these options is that (except for DuckDB) the database loading of agera5tools relies on the to_sql() functionality of pandas which is a relatively slow method. However, for setups over large regions, this can be very slow and instead you want to export to CSV files. Next you can load the database by using dedicated loading tools such as `pgloader`_ for postgress, sqlloader for ORACLE and MySQL LOAD DATA statements which take the CSV files as input. Note that this latter does not apply to DuckDB which can load data directly from pandas dataframes very efficiently
Alternatively, you can use the buildym command to build the database for a specific year/month. This can be useful in certain situations where you want to force building of CSV files for database loading for a specific year/month.
$ agera5tools buildym --help
Usage: agera5tools buildym [OPTIONS] YEAR MONTH

  Builds the AgERA5 database by bulk download from CDS for given year/month
  only

Options:
  -d, --to_database  Load AgERA5 data into the database
  -c, --to_csv       Write AgERA5 data to compressed CSV files.
  --help             Show this message and exit.
For the current example, we will run build and directly write data into the DuckDB database:
$ agera5tools build --to_database
using config from /data/agera5/agera5tools.yaml
Export to database: True
Export to CSV: False
Note that the downloading and building of the database will not produce any output on the console. Instead output is reported in the log file and one should monitor the log file in order to know the progress. An example of the output produced in the log file is here:
2023-01-10 15:14:24,105 [INFO] agera5tools.build: Starting AgERA5 download for 2021-11
2023-01-10 15:14:24,119 [INFO] agera5tools.build: Skipping download, NetCDF files already exist.
2023-01-10 15:14:24,119 [INFO] agera5tools.build: Starting AgERA5 download for 2021-12
2023-01-10 15:14:24,143 [INFO] agera5tools.build: Skipping download, NetCDF files already exist.
2023-01-10 15:14:31,620 [INFO] agera5tools.build: Written AgERA5 data for 2020-01 to database.
2023-01-10 15:14:40,532 [INFO] agera5tools.build: Written AgERA5 data for 2020-02 to database.
2023-01-10 15:14:50,363 [INFO] agera5tools.build: Written AgERA5 data for 2020-03 to database.
2023-01-10 15:15:01,190 [INFO] agera5tools.build: Written AgERA5 data for 2020-04 to database.
2023-01-10 15:15:11,829 [INFO] agera5tools.build: Written AgERA5 data for 2020-05 to database.
2023-01-10 15:15:22,660 [INFO] agera5tools.build: Written AgERA5 data for 2020-06 to database.
Finally, the build command will complete:
$ agera5tools build --to_database
using config from /data/agera5/agera5tools.yaml
Export to database: True
Export to CSV: False
Done building database, use the `mirror` command to keep the DB up to date
Keeping AgERA5 up to date: mirroring
The AgERA5 dataset receives daily updates and thus a new set of NetCDF files is available on the CDS around 17:00 UTC. To keep your local copy of AgERA5 in sync with the AgERA5 data on the CDS, agera5tools provides a mirror command. This mirror command will query the local AgERA5 database for the available days and compares it to the days that should be available. The latter is computed as the 1 st of January of the start year in the configuration, up till 8 days before today.
The mirror command provides only a single option –to_csv which allows to write the data to a compressed CSV file. The mirror command will always update the database because mirror assumes that the amount of data to load is limited (only a few days) for which performance is sufficient.
$ agera5tools mirror --help
using config from /data/agera5/agera5tools.yaml
Usage: agera5tools mirror [OPTIONS]

  Incrementally updates the AgERA5 database by daily downloads from the CDS

Options:
  -c, --to_csv   Write AgERA5 data to compressed CSV files.
  -d, --dry-run  Do not run mirror but only check for days to update.
  --help         Show this message and exit.
When running the mirror command on a database with a few days missing, it will update the database and report on the number of days missing. Detailed information can be found in the log files.
$ agera5tools mirror
using config from /data/agera5/agera5tools.yaml
Mirror found the following:
 - Days found for mirroring: 2023-01-04, 2023-01-05
 - Days successfully updated: 2023-01-04, 2023-01-05
It may occur that days are not yet be available on the CDS. In that case mirror is not able to download the data and it will not be able to update the database. Unfortunately, the python CDS API is such that it will issue a large number of error messages to the screen which are hard to intercept:
[ERROR] - Failed downloading Temperature_Air_2m_Max_Day_Time - 2023-01-19
Traceback (most recent call last):
  File "/home/wit015/bin/miniconda3/envs/py38_a5t/lib/python3.8/site-packages/agera5tools/mirror.py", line 86, in download_one_day
    c.retrieve('sis-agrometeorological-indicators', cds_query, download_fname)
  File "/home/wit015/bin/miniconda3/envs/py38_a5t/lib/python3.8/site-packages/cdsapi/api.py", line 348, in retrieve
    result = self._api("%s/resources/%s" % (self.url, name), request, "POST")
  File "/home/wit015/bin/miniconda3/envs/py38_a5t/lib/python3.8/site-packages/cdsapi/api.py", line 506, in _api
    raise Exception(
Exception: the request you have submitted is not valid. There is no data matching your request. Check that you have specified the correct fields and values..
Nevertheless, the last lines summarize what mirror was able to do:
Mirror found the following:
 - Days found for mirroring: 2023-01-19
 - Days successfully updated: N/A
 - Days failed to update: 2023-01-19, see log for details
Other agera5tools commands
The agera5tools package provides several other commands that can be useful when working with AgERA5. These commands operate on the NetCDF files directly and are therefore only useful when the NetCDF files are kept.
Check
The check command can be used to check if the collection of NetCDF files obtained from the CDS is complete. For example, running agera5tools check on a database that was not updated for a day will provide the list of missing netCDF files:
$ agera5tools check
using config from /data/agera5/agera5tools.yaml
Found 7 missing NetCDF files under /data/agera5/ncfiles:
 - /data/agera5/ncfiles/2022/Temperature-Air-2m-Mean-24h/Temperature-Air-2m-Mean-24h_C3S-glob-agric_AgERA5_20221231_final-v1.0.nc
 - /data/agera5/ncfiles/2022/Temperature-Air-2m-Max-Day-Time/Temperature-Air-2m-Max-Day-Time_C3S-glob-agric_AgERA5_20221231_final-v1.0.nc
 - /data/agera5/ncfiles/2022/Temperature-Air-2m-Min-Night-Time/Temperature-Air-2m-Min-Night-Time_C3S-glob-agric_AgERA5_20221231_final-v1.0.nc
 - /data/agera5/ncfiles/2022/Vapour-Pressure-Mean/Vapour-Pressure-Mean_C3S-glob-agric_AgERA5_20221231_final-v1.0.nc
 - /data/agera5/ncfiles/2022/Precipitation-Flux/Precipitation-Flux_C3S-glob-agric_AgERA5_20221231_final-v1.0.nc
 - /data/agera5/ncfiles/2022/Solar-Radiation-Flux/Solar-Radiation-Flux_C3S-glob-agric_AgERA5_20221231_final-v1.0.nc
 - /data/agera5/ncfiles/2022/Wind-Speed-10m-Mean/Wind-Speed-10m-Mean_C3S-glob-agric_AgERA5_20221231_final-v1.0.nc
Clip
The clip command can be used to clip a rectangular area out of the region for which agera5tools is set up, for a given day. Note that the bounding box of the region for clipping should lie within the bounding box of the agera5tools setup. The command creates a new NetCDF file which contains all the AgERA5 variables in one file:
$ agera5tools clip -o /tmp/a5t/ --bbox 88 90 25 27 2022-07-03
using config from /data/agera5/agera5tools.yaml
Written results to: /tmp/a5t/agera5_clipped_2022-07-03.nc

$ ncdump -h /tmp/a5t/agera5_clipped_2022-07-03.nc
netcdf agera5_clipped_2022-07-03 {
dimensions:
    time = 1 ;
    lon = 20 ;
    lat = 20 ;
variables:
    int64 time(time) ;
        time:standard_name = "time" ;
        time:long_name = "time" ;
        time:axis = "T" ;
        time:units = "days since 1900-01-01" ;
        time:calendar = "proleptic_gregorian" ;
    double lon(lon) ;
        lon:_FillValue = NaN ;
        lon:standard_name = "longitude" ;
        lon:long_name = "longitude" ;
        lon:units = "degrees_east" ;
        lon:axis = "X" ;
    double lat(lat) ;
        lat:_FillValue = NaN ;
        lat:standard_name = "latitude" ;
        lat:long_name = "latitude" ;
        lat:units = "degrees_north" ;
        lat:axis = "Y" ;
    float Precipitation_Flux(time, lat, lon) ;
        Precipitation_Flux:_FillValue = -9999.f ;
        Precipitation_Flux:units = "mm d-1" ;
        Precipitation_Flux:long_name = "Total precipitation (00-00LT)" ;
        Precipitation_Flux:temporal_aggregation = "Sum 00-00LT" ;
        Precipitation_Flux:missing_value = -9999.f ;
    float Solar_Radiation_Flux(time, lat, lon) ;
        Solar_Radiation_Flux:_FillValue = -9999.f ;
        Solar_Radiation_Flux:units = "J m-2 d-1" ;
        Solar_Radiation_Flux:long_name = "Surface solar radiation downwards (00-00LT)" ;
        Solar_Radiation_Flux:temporal_aggregation = "Sum 00-00LT" ;
        Solar_Radiation_Flux:missing_value = -9999.f ;
    float Temperature_Air_2m_Max_Day_Time(time, lat, lon) ;
        Temperature_Air_2m_Max_Day_Time:_FillValue = -9999.f ;
        Temperature_Air_2m_Max_Day_Time:units = "K" ;
        Temperature_Air_2m_Max_Day_Time:long_name = "Maximum temperature at 2 meter (06-18LT)" ;
        Temperature_Air_2m_Max_Day_Time:temporal_aggregation = "Max 06-18LT" ;
        Temperature_Air_2m_Max_Day_Time:missing_value = -9999.f ;
    float Temperature_Air_2m_Mean_24h(time, lat, lon) ;
        Temperature_Air_2m_Mean_24h:_FillValue = -9999.f ;
        Temperature_Air_2m_Mean_24h:units = "K" ;
        Temperature_Air_2m_Mean_24h:long_name = "2 meter air temperature (00-00LT)" ;
        Temperature_Air_2m_Mean_24h:temporal_aggregation = "Mean 00-00LT" ;
        Temperature_Air_2m_Mean_24h:missing_value = -9999.f ;
    float Temperature_Air_2m_Min_Night_Time(time, lat, lon) ;
        Temperature_Air_2m_Min_Night_Time:_FillValue = -9999.f ;
        Temperature_Air_2m_Min_Night_Time:units = "K" ;
        Temperature_Air_2m_Min_Night_Time:long_name = "Minimum temperature at 2 meter (18-06LT)" ;
        Temperature_Air_2m_Min_Night_Time:temporal_aggregation = "Min 18-06LT" ;
        Temperature_Air_2m_Min_Night_Time:missing_value = -9999.f ;
    float Vapour_Pressure_Mean(time, lat, lon) ;
        Vapour_Pressure_Mean:_FillValue = -9999.f ;
        Vapour_Pressure_Mean:units = "hPa" ;
        Vapour_Pressure_Mean:long_name = "Vapour pressure (00-00LT)" ;
        Vapour_Pressure_Mean:temporal_aggregation = "Mean 00-00LT" ;
        Vapour_Pressure_Mean:missing_value = -9999.f ;
    float Wind_Speed_10m_Mean(time, lat, lon) ;
        Wind_Speed_10m_Mean:_FillValue = -9999.f ;
        Wind_Speed_10m_Mean:units = "m s-1" ;
        Wind_Speed_10m_Mean:long_name = "10 metre wind component (00-00LT)" ;
        Wind_Speed_10m_Mean:temporal_aggregation = "Mean 00-00LT" ;
        Wind_Speed_10m_Mean:missing_value = -9999.f ;

// global attributes:
        :Conventions = "CF-1.7" ;
}
Dump
The dump command can be used to take the contents of the NetCDF files of AgERA5 for a given day, and dump the results to a tabular format which can be either CSV, JSON or an SQLite database depending on the suffix of the output filename (.csv, .json or .db3). If no output filename is provided, the dump command will send its output to standard output in CSV format.
The example below shows how to dump to JSON for a small region within Bangladesh:
$ agera5tools dump -o /tmp/a5t/agera_2022-07-03.json --bbox 88 90 25 27 2022-07-03
using config from /data/agera5/agera5tools.yaml
Written JSON output to: /tmp/a5t/agera_2022-07-03.json

$ cat /tmp/a5t/agera_2022-07-03.json | jq
[
  {
    "day": 1656806400000,
    "lon": 88.15,
    "lat": 26.95,
    "precipitation_flux": 3.5599999428,
    "solar_radiation_flux": 16385375,
    "temperature_air_2m_max_day_time": 24.7488708496,
    "temperature_air_2m_mean_24h": 21.5311584473,
    "temperature_air_2m_min_night_time": 18.8098754883,
    "vapour_pressure_mean": 22.9674816132,
    "wind_speed_10m_mean": 1.1026197672
  },
...
  {
    "day": 1656806400000,
    "lon": 90.05,
    "lat": 25.05,
    "precipitation_flux": 4.4800000191,
    "solar_radiation_flux": 18370952,
    "temperature_air_2m_max_day_time": 32.2112121582,
    "temperature_air_2m_mean_24h": 28.7552490234,
    "temperature_air_2m_min_night_time": 26.2648620605,
    "vapour_pressure_mean": 32.9158477783,
    "wind_speed_10m_mean": 2.8463871479
  }
]
Extract_point
The extract_point command can be used to extract the time-series of AgERA5 data for a given location specified by its latitude and longitude, moreover the time-series can be limited by a start date and an end date. The output will be written in a tabular format which can be either CSV, JSON or an SQLite database depending on the suffix of the output filename (.csv, .json or .db3). If no output filename is provided, the extract_point command will send its output to standard output in CSV format.
$ agera5tools extract_point 90 24 2022-06-01 2022-06-05
using config from /data/agera5/agera5tools.yaml
day,precipitation_flux,solar_radiation_flux,temperature_air_2m_max_day_time,temperature_air_2m_mean_24h,temperature_air_2m_min_night_time,vapour_pressure_mean,wind_speed_10m_mean
2022-06-01,   6.03,19547780,  31.98,  28.38,  25.76,  32.43,   2.59
2022-06-02,  44.67,9140519,  30.06,  28.03,  25.56,  32.08,   2.04
2022-06-03,   2.93,12673785,  31.15,  28.59,  26.02,  32.72,   3.41
2022-06-04,   2.16,16276887,  32.50,  28.10,  26.70,  32.77,   3.69
2022-06-05,   3.09,18650926,  32.79,  29.38,  26.75,  34.05,   3.82
Note that specifying negative latitude/longitude values will lead to an error because agera5tools interprets this as a commandline option:
$ agera5tools extract_point 90 -24 2022-06-01 2022-06-05
using config from /data/wit015/agera5/agera5tools.yaml
Usage: agera5tools extract_point [OPTIONS] LONGITUDE LATITUDE STARTDATE
                                 ENDDATE
Try 'agera5tools extract_point --help' for help.

Error: No such option: -2
The solution is to specify it like this:
$ agera5tools extract_point -- 90 -24 2022-06-01 2022-06-05
using config from /data/wit015/agera5/agera5tools.yaml
the point with longitude  90.00 and latitude -24.00 is not within the boundingbox of this setup
Although this point itself is not within geographic boundaries of the example used here.
Dump_grid
The dump_grid command can be used to dump the grid definition of AgERA5 to a tabular format. It has little use outside the initial set up of the AgERA5 database, but is added for convenience. For set ups for large regions it is often more convenient to dump the grid to CSV and load it with a dedicated tool. Similar to dump extract_point, the dump_grid command can write to CSV, JSON or SQLite and will write to stdout if no output is given:
$ agera5tools dump_grid | head
using config from /data/agera5/agera5tools.yaml
ll_latitude,ll_longitude,idgrid_era5,elevation,land_fraction,latitude,longitude
  83.90, -40.30,6258197,  -4.62,   0.00,  83.95, -40.25
  83.90, -40.20,6258198,  -4.62,   0.00,  83.95, -40.15
  83.90, -40.10,6258199,  -4.62,   0.00,  83.95, -40.05
  83.90, -40.00,6258200,   7.40,   0.00,  83.95, -39.95
  83.90, -39.90,6258201,   7.40,   0.00,  83.95, -39.85
  83.90, -39.80,6258202,   7.40,   0.00,  83.95, -39.75
  83.90, -39.70,6258203,  19.50,   0.00,  83.95, -39.65
  83.90, -39.60,6258204,  19.50,   0.00,  83.95, -39.55
Serving AgERA5 data through an HTTP API
Creating a local mirror of the AgERA5 database only starts to be useful when the data is easily accessible for applications. For this purpose, agera5tools can serve the AgERA5 data in the database through a web API using the HTTP protocol. Time-series of AgERA5 data can be requested through a parameterized URL which provides the location for which the data is requested as well as an optional start and end date. Through this approach AgERA5 data can be made available for application running locally or through a webserver on the local network.
For serving data on a local network agera5tools provides the serve command which has a single option –port=<number>. By default the port number is 8080, but the port number can be changed to solve conflicts with existing web applications or by allowing multiple agera5tools instances to run simultaneously:
$ agera5tools serve
using config from /data/agera5/agera5tools.yaml
Started serving AgERA5 data on http://localhost:8080
When a web browser is pointed to http://localhost:8080, the browser will show a short help text as show in the image below.
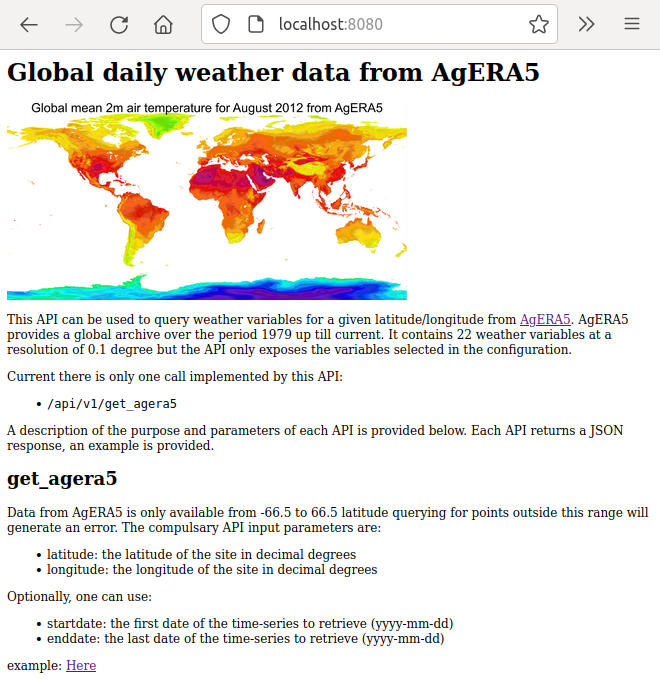
Moreover, the help page contains an example URL at the bottom below that can be used to query data from the database and demonstrate the response, as shown below.
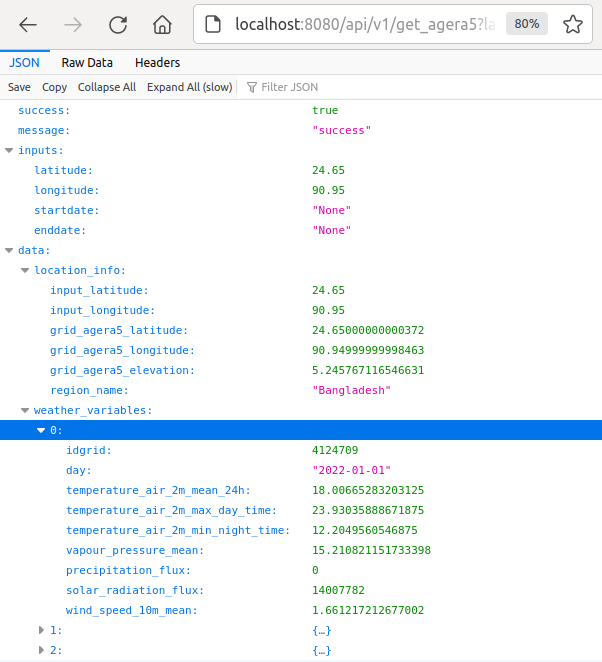
finally, take note of the warning below on using agera5tools serve.
Warning
The serve capabilities of agera5tools are based on the Flask web framework combined with a WSGI server. This combination is an effective and lightweight approach to serving data on a local machine or a local network. This approach is not guaranteed to be safe and robust enough to serve AgERA5 on a web address that is exposed to the outside world. For such a task you will probably need a set up that combines a secure high performance web server (such as NGINX) that works with a WSGI server on the background (the one that can serve Flask applications). Ideally this could be done using docker for which a nice tutorial and base docker images are available here.
Using agera5tools directly from python
The shell commands described above can also be used from python directly by importing the agera5tools package. Their working is nearly identical as the shell commands. The major difference is that the python functions return either datasets (clip) or dataframes (extract_point, dump, dump_grid). An example for the clip function:
In [1]: import datetime as dt
   ...: import agera5tools
   ...: from agera5tools.util import BoundingBox
   ...: day = dt.date(2018,1,1)
   ...: bbox = BoundingBox(lon_min=87, lon_max=90, lat_min=24, lat_max=27)
   ...: ds = agera5tools.clip(day, bbox)
   ...:

In [2]: ds
Out[2]:
<xarray.Dataset>
Dimensions:                            (time: 1, lon: 30, lat: 30)
Coordinates:
  * time                               (time) datetime64[ns] 2018-01-01
  * lon                                (lon) float64 87.1 87.2 ... 89.9 90.0
  * lat                                (lat) float64 26.9 26.8 ... 24.1 24.0
Data variables:
    Precipitation_Flux                 (time, lat, lon) float32 dask.array<chunksize=(1, 30, 30), meta=np.ndarray>
    Solar_Radiation_Flux               (time, lat, lon) float32 dask.array<chunksize=(1, 30, 30), meta=np.ndarray>
    Temperature_Air_2m_Max_Day_Time    (time, lat, lon) float32 dask.array<chunksize=(1, 30, 30), meta=np.ndarray>
    Temperature_Air_2m_Mean_24h        (time, lat, lon) float32 dask.array<chunksize=(1, 30, 30), meta=np.ndarray>
    Temperature_Air_2m_Min_Night_Time  (time, lat, lon) float32 dask.array<chunksize=(1, 30, 30), meta=np.ndarray>
    Vapour_Pressure_Mean               (time, lat, lon) float32 dask.array<chunksize=(1, 30, 30), meta=np.ndarray>
    Wind_Speed_10m_Mean                (time, lat, lon) float32 dask.array<chunksize=(1, 30, 30), meta=np.ndarray>
Attributes:
    CDI:          Climate Data Interface version 1.9.2 (http://mpimet.mpg.de/...
    history:      Fri Mar 12 15:04:43 2021: cdo splitday /archive/ESG/wit015/...
    Conventions:  CF-1.7
    CDO:          Climate Data Operators version 1.9.2 (http://mpimet.mpg.de/...
It works in a very similar way for the extract_point function:
In[6]: from agera5tools.util import Point
In[7]: pnt = Point(latitude=26, longitude=89)
In[8]: df = agera5tools.extract_point(pnt, startday=dt.date(2018, 1, 1), endday=dt.date(2018, 1, 31)),
In [7]: df.head(5)
Out[7]:
          day  precipitation_flux  solar_radiation_flux  ...  temperature_air_2m_min_night_time  vapour_pressure_mean  wind_speed_10m_mean
0  2018-01-01                0.31              13282992  ...                          12.156799             11.809731             1.317589
1  2018-01-02                1.91              13646220  ...                          12.342041             11.711860             1.416075
2  2018-01-03                0.14              14817991  ...                          11.064514             11.198871             1.524268
3  2018-01-04                0.03              14131904  ...                          10.861877             11.413278             1.566405
4  2018-01-05                0.07              14315206  ...                          12.292969             10.984181             1.597181

[5 rows x 8 columns]
Note that extracting point data for a long timeseries can be time-consuming because all netCDF files have to be opened, decompressed and the point extracted.
Using agera5tools with PCSE models
AgERA5tools was designed with crop models running in PCSE in mind, so you directly use output from the agera5tools serve into your model running in PCSE. Note that you do need at least the set of weather variables in the default configuration file, otherwise the WeatherDataProvider will complain about missing variables. Moreover, you need to have PCSE installed in your python environment:
In [1]: import agera5tools
using config from /data/agera5/agera5tools.yaml

In [2]: from agera5tools.wdp import AgERA5WeatherDataProvider

In [3]: wdp = AgERA5WeatherDataProvider(longitude=88, latitude=25)

In [4]: print(wdp)
Weather data provided by: AgERA5WeatherDataProvider
--------Description---------
Weather data from AgERA5 for Bangladesh
----Site characteristics----
Elevation:   35.9
Latitude:  25.000
Longitude: 88.000
Data available for 2022-01-01 - 2023-01-25
Number of missing days: 0
This assumes that agera5tools serve is running under http://localhost:8080, otherwise you need to specify the hostname and port number with AgERA5WeatherDataProvider(longitude=88, latitude=25, hostname=<host>, port=<num>)
A note on efficient database loading
Using agera5tools build for large areas and/or long time-series can take a long time because of the large number of records that have to be loaded into the database. Currently, the most efficient solution is DuckDB (the default database choice) because it direcly loads from a pandas dataframe to a DuckDB database without any intermediate steps. However, in some cases using DuckDB is not possible and another relational database has to be used. In such cases it is more efficient to dump data to CSV first and load the CSV files with dedicated loader tools, particularly for large setups. Moreover, for efficient loading it is best to disable any keys and lock the table for exclusive write mode, which is not done by agera5tools. Below I show an example of how efficient loading can be done for MySQL (or MariaDB) and PostgreSQL.
Note
The remarks given above on efficient database loading do not apply to the default column-oriented duckdb database. However, for classical row-oriented database like MySQL, PostgreSQL and ORACLE it is strongly advised to choose an appropriate approach for loading data.
Bulk loading AgERA5 with MySQL
For this tutorial I will be using some tricks and constructs that work well in a linux terminal environment. It may work similarly in a windows command prompt but it wasn’t tested and your mileage may vary. If problems arise on windows, a solution is to install cygwin and use the MySQL client from cygwin. Otherwise the Windows Subsystem for Linux (WSL) is an alternative. Furthermore, I assume that MySQL has been set up properly and that there is a .my.cnf file in your home folder that provides the username/password and default schema for automatically logging you onto the database. So typing mysql on the command prompt should bring you to the database:
$ mysql
Reading table information for completion of table and column names
You can turn off this feature to get a quicker startup with -A

Welcome to the MySQL monitor.  Commands end with ; or \g.
Your MySQL connection id is 37
Server version: 5.7.41-0ubuntu0.18.04.1 (Ubuntu)

Copyright (c) 2000, 2023, Oracle and/or its affiliates.

Oracle is a registered trademark of Oracle Corporation and/or its
affiliates. Other names may be trademarks of their respective
owners.

Type 'help;' or '\h' for help. Type '\c' to clear the current input statement.

mysql>
If the table for holding AgERA5 data does not yet exist, you need to create it:
mysql> CREATE TABLE weather_grid_agera5 (
    -> idgrid INTEGER NOT NULL,
    -> day DATE NOT NULL,
    -> temperature_air_2m_mean_24h FLOAT,
    -> temperature_air_2m_max_day_time FLOAT,
    -> temperature_air_2m_min_night_time FLOAT,
    -> vapour_pressure_mean FLOAT,
    -> precipitation_flux FLOAT,
    -> solar_radiation_flux FLOAT,
    -> wind_speed_10m_mean FLOAT,
    -> PRIMARY KEY (idgrid, day)
    -> );
Query OK, 0 rows affected (0.26 sec)

mysql> desc weather_grid_agera5;
+-----------------------------------+---------+------+-----+---------+-------+
| Field                             | Type    | Null | Key | Default | Extra |
+-----------------------------------+---------+------+-----+---------+-------+
| idgrid                            | int(11) | NO   | PRI | NULL    |       |
| day                               | date    | NO   | PRI | NULL    |       |
| temperature_air_2m_mean_24h       | float   | YES  |     | NULL    |       |
| temperature_air_2m_max_day_time   | float   | YES  |     | NULL    |       |
| temperature_air_2m_min_night_time | float   | YES  |     | NULL    |       |
| vapour_pressure_mean              | float   | YES  |     | NULL    |       |
| precipitation_flux                | float   | YES  |     | NULL    |       |
| solar_radiation_flux              | float   | YES  |     | NULL    |       |
| wind_speed_10m_mean               | float   | YES  |     | NULL    |       |
+-----------------------------------+---------+------+-----+---------+-------+
9 rows in set (0.00 sec)
Next, we will need the MySQL LOAD DATA functionality to load the CSV data efficiently. For doing so we need to create a script that uses LOAD DATA to import the CSV file into the right table. For doing so, we need to have a look at the CSV file first in order to determine the order with which the columns are written in the CSV. The default behaviour is to write them in alphabetical order, except for the grid ID which will be the last column. Because the CSV files are compressed we decompress them with gunzip -c but use head to only look at the first 10 lines:
$ gunzip -c weather_grid_agera5_2022-01.csv.gz | head
day,precipitation_flux,solar_radiation_flux,temperature_air_2m_max_day_time,temperature_air_2m_mean_24h,temperature_air_2m_min_night_time,vapour_pressure_mean,wind_speed_10m_mean,idgrid
2022-01-01,-0.0,13162135.0,292.19467,287.67047,284.1365,11.893626,1.4917772,4207471
2022-01-02,0.0,14147829.0,293.13916,287.74905,283.92963,11.357639,1.4644603,4207471
2022-01-03,0.0,14122248.0,292.5527,287.527,283.97925,11.133619,1.3984656,4207471
2022-01-04,0.0,14469930.0,292.50192,286.96817,283.54135,11.348025,1.5083425,4207471
2022-01-05,0.0,13900673.0,293.0584,287.81125,284.21835,11.7578745,1.5004104,4207471
2022-01-06,0.65,12647058.0,293.09354,288.46628,284.49408,12.955705,1.4924479,4207471
2022-01-07,0.85,10431268.0,293.1321,289.32684,286.35342,13.785025,1.3877448,4207471
2022-01-08,0.07,13741905.0,294.67032,289.89453,285.54935,14.013409,1.3313966,4207471
2022-01-09,0.25,12168522.0,294.0305,290.2176,286.22925,14.745159,1.4008508,4207471
Here we can see that the column names in the CSV file are indeed in alphabetical order and the idgrid column is the last column. We have to take this into account when inserting columns in the CSV file to columns in the database.
As we know the order of the columns we can now define the SQL query to load the data into the table. Most of the commands in the query below are easy to understand with some help of the MySQL manual. The only element that requires explanation is that we are not reading from a CSV file directly, but instead we read from /dev/stdin. Remember that agera5tools writes compressed CSV files using gzip. So reading from a CSV file would require us to first decompress the file. However, the gunzip command can write to /dev/stdin with the -c option. By using this approach we can unzip the CSV files on-the-fly, write the output to /dev/stdin and let MySQL read it from there. This has an additional advantage that the loader file is reusable and we do not need to edit it to change the CSV filename when loading another file.
We need to write the SQL query to a text file load.sql and write it in the same directory where the CSV files are stored, in this case /data/agera5/csv/
LOCK TABLES weather_grid_agera5 WRITE;
ALTER TABLE weather_grid_agera5 DISABLE KEYS;

LOAD DATA LOCAL INFILE '/dev/stdin'
INTO TABLE weather_grid_agera5
FIELDS TERMINATED BY ',' OPTIONALLY ENCLOSED BY '"'
IGNORE 1 LINES
(@col1,@col2,@col3,@col4,@col5,@col6,@col7,@col8,@col9)
SET
   day = str_to_date(@col1,'%Y-%m-%d'),
   precipitation_flux = @col2,
   solar_radiation_flux = @col3,
   temperature_air_2m_mean_24h = @col4,
   temperature_air_2m_max_day_time = @col5,
   temperature_air_2m_min_night_time = @col6,
   vapour_pressure_mean = @col7,
   wind_speed_10m_mean = @col8,
   idgrid = @col9
;
ALTER TABLE weather_grid_agera5 ENABLE KEYS;
UNLOCK TABLES;
The final step is now to start the actual loading process in MySQL. For this we use the gunzip command to decompress the CSV file, pipe the output from gunzip to the MySQL client program while instructing MySQL client to read the LOAD DATA instructions with mysql -e "source /data/agera5/csv/load.sql". One additional flag is sometimes required --local-infile which instructs MySQL to allow loading data from local clients (which is a security risk). The complete instruction for loading 1 month of AgERA5 data becomes:
$ gunzip -c weather_grid_agera5_2022-01.csv.gz | mysql --local-infile -e "source /data/agera5/csv/load.sql"
We can now check if the number of records in the database corresponds with the number of lines in the CSV file. The number of lines in the CSV files is:
$ gunzip -c weather_grid_agera5_2022-01.csv.gz | wc -l
103076
While the number of records in the database table is:
$ mysql
Reading table information for completion of table and column names
You can turn off this feature to get a quicker startup with -A

Welcome to the MySQL monitor.  Commands end with ; or \g.
Your MySQL connection id is 52
Server version: 5.7.41-0ubuntu0.18.04.1 (Ubuntu)

Copyright (c) 2000, 2023, Oracle and/or its affiliates.

Oracle is a registered trademark of Oracle Corporation and/or its
affiliates. Other names may be trademarks of their respective
owners.

Type 'help;' or '\h' for help. Type '\c' to clear the current input statement.

mysql> select count(*) from weather_grid_agera5;
+----------+
| count(*) |
+----------+
|   103075 |
+----------+
1 row in set (0.03 sec)
As you can see we are missing 1 record which is exactly the header line in the CSV file that we skipped when loading data from it.
Bulk loading AgERA5 with PostgreSQL
For loading agERA5 data into PostgreSQL we can use a dedicated loader tool: pgloader. I assume pgloader is intalled in your environmental and I also assume that there is a properly configured PosgreSQL database. Moreover we can log on to the right schema with the psql commandline tool. So first we log on to the database and create the output table with the following SQL:
CREATE TABLE weather_grid_agera5 (
        -> idgrid INTEGER NOT NULL,
        -> day DATE NOT NULL,
        -> temperature_air_2m_mean_24h FLOAT,
        -> temperature_air_2m_max_day_time FLOAT,
        -> temperature_air_2m_min_night_time FLOAT,
        -> vapour_pressure_mean FLOAT,
        -> precipitation_flux FLOAT,
        -> solar_radiation_flux FLOAT,
        -> wind_speed_10m_mean FLOAT
        -> );
Note that agera5tools init will automatically create the output table for you, but for the example we create it manually. In this case we also leave out the primary key definition as PostgreSQL has no option to disable indexes so it is better to create the primary key after loading all data. So after starting psql we create the table:
$ psql -U <username> -W <password> -h <hostname> <databasename>
psql (12.13 (Ubuntu 12.13-1.pgdg18.04+1))
SSL connection (protocol: TLSv1.2, cipher: ECDHE-RSA-AES256-GCM-SHA384, bits: 256, compression: off)
Type "help" for help.

agera5db=> CREATE TABLE weather_grid_agera5 (
agera5db(>     idgrid INTEGER NOT NULL,
agera5db(>     day DATE NOT NULL,
agera5db(>     temperature_air_2m_mean_24h FLOAT,
agera5db(>     temperature_air_2m_max_day_time FLOAT,
agera5db(>     temperature_air_2m_min_night_time FLOAT,
agera5db(>     vapour_pressure_mean FLOAT,
agera5db(>     precipitation_flux FLOAT,
agera5db(>     solar_radiation_flux FLOAT,
agera5db(>     wind_speed_10m_mean FLOAT
agera5db(>     );
CREATE TABLE
agera5db=>
After creating the table for holding the agERA5 data, we can now write the control file that pgloader requires to load the data. They syntax is somewhat similar to the MySQL LOAD DATA statement but not compatible:
LOAD CSV
   FROM STDIN
        HAVING FIELDS
        (
           day [date format 'YYYY-MM-DD'],
           precipitation_flux,
           solar_radiation_flux,
           temperature_air_2m_mean_24h,
           temperature_air_2m_max_day_time,
           temperature_air_2m_min_night_time,
           vapour_pressure_mean,
           wind_speed_10m_mean,
           idgrid
        )
   INTO postgresql://<user>:<passwd>@<hostname>/<dbname>?sslmode=require
       TARGET TABLE weather_grid_agera5
       TARGET COLUMNS
           (
           idgrid, day,
           precipitation_flux,
           solar_radiation_flux,
           temperature_air_2m_mean_24h,
           temperature_air_2m_max_day_time,
           temperature_air_2m_min_night_time,
           vapour_pressure_mean,
           wind_speed_10m_mean
           )
   WITH skip header = 1,
        fields terminated by ','
   SET work_mem to '32 MB', maintenance_work_mem to '64 MB';
Note that, similar to MySQL, the order of the column names in the “HAVING FIELDS” clause is critical for reading and inserting the data in the correct columns in the database table. Also with pgloader we can read directly from standard input (here: STDIN) which avoids having to write decompressed CSV files. In my specific case, the database connection string needed an extra parameter sslmode=require, this may depend on your database setup.
Finally, we can start loading the data with the pgloader tool. I assume that we start pgloader from /data/agera5/csv which also contains the control file load_agera5.ctl. Moreover, we assign the current directory as work directory with -D $PWD which puts the pgloader log files in the current directory. The full command than becomes:
$ gunzip -c weather_grid_agera5_2022-01.csv.gz | \
  pgloader -D $PWD --logfile load_agera5.log --summary load_agera5.summary \
           --no-ssl-cert-verification load_agera5.ctl
2023-01-31T13:54:22.039000Z LOG pgloader version "3.6.7~devel"
2023-01-31T13:54:29.243000Z LOG report summary reset
We can now look at the summary to see if loading was successful:
$ cat load_agera5.summary
                    table name     errors       rows      bytes      total time
------------------------------  ---------  ---------  ---------  --------------
                         fetch          0          0                     0.009s
                   before load          0          1                     0.041s
------------------------------  ---------  ---------  ---------  --------------
"agera5db"."weather_grid_agera5"        0     103075     9.0 MB          6.945s
------------------------------  ---------  ---------  ---------  --------------
               Files Processed          0          1                     0.021s
       COPY Threads Completion          0          2                     6.945s
------------------------------  ---------  ---------  ---------  --------------
             Total import time          ✓     103075     9.0 MB          6.966s
Based on the summary results, we can see that loading was successful and we have loaded exactly 103075 lines.
Bulk loading AgERA5 with Oracle
Bulk loading of AgERA5 data into Oracle can be done with the SQL*Loader utility. Since I do not have an Oracle database readily available, I cannot demonstrate how this should be done exactly. However, it has many similarites with pgloader as the SQL*Loader tool also requires a control file that describes the inputs and output target.